/*
Arduino DCC Automatic Train Control (ADATC)
by PeteW, February 2016
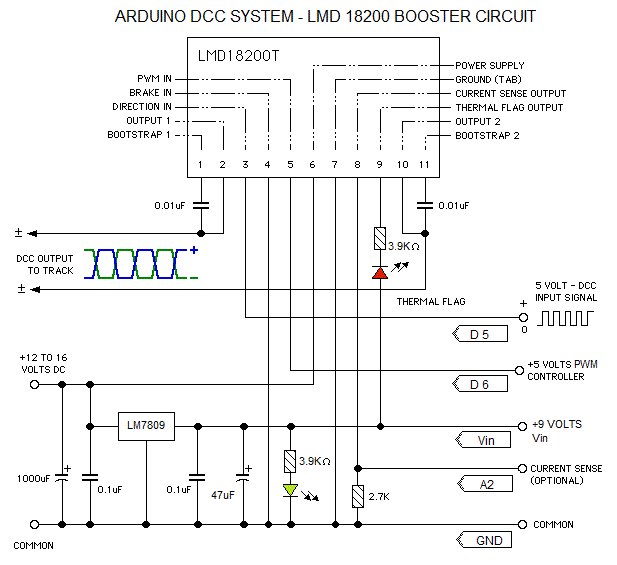
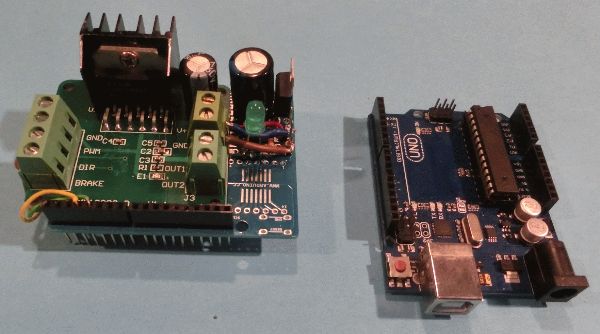
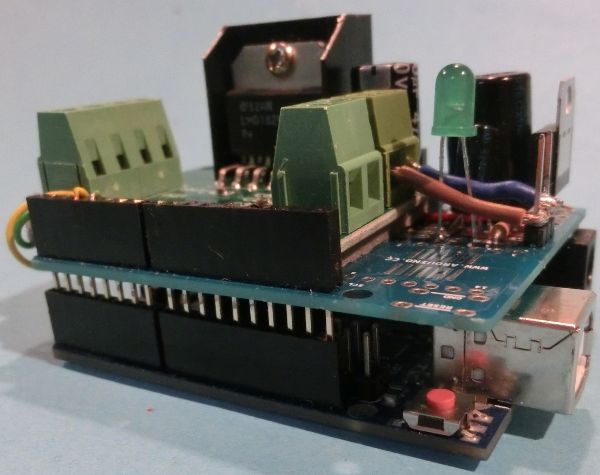
This program sends pulses 0v-5v on DCC_PIN that is amplified by a LMD18200 Booster.
Circuit setup:
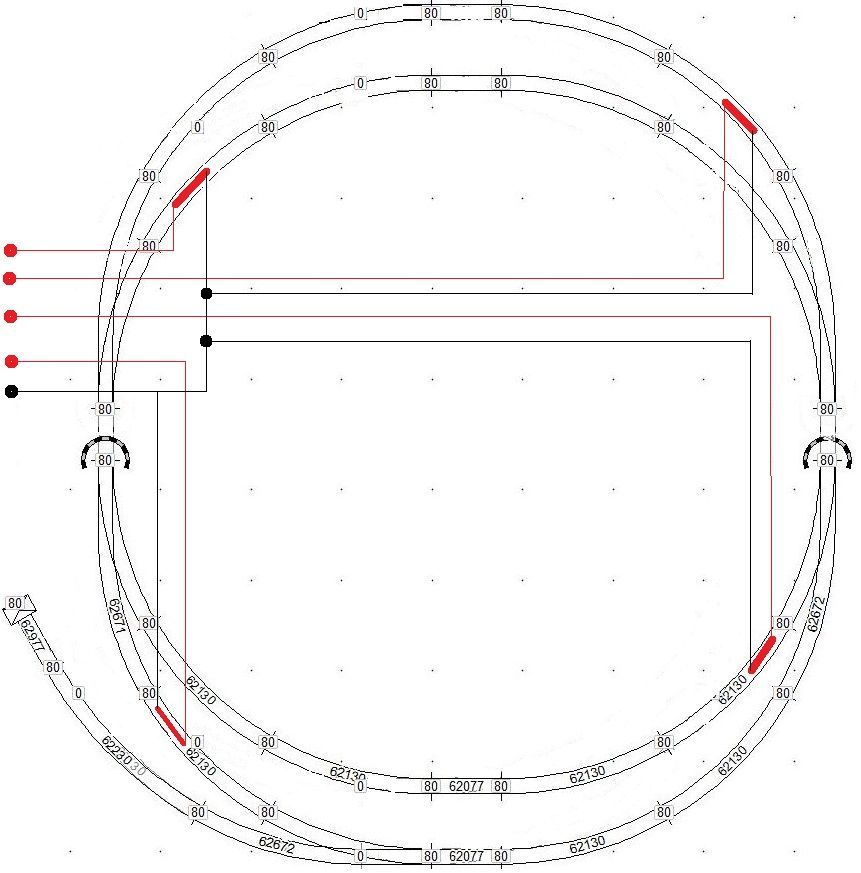
Station switch: +5V - pulse swx - |pin2| - 10Kohm Resistor - GND
Parking switch: +5V - pulse swx - |pin7| - 10Kohm Resistor - GND
Passing switch: +5V - pulse swx - |pin8| - 10Kohm Resistor - GND
Parking switch: +5V - pulse swx - |pin9| - 10Kohm Resistor - GND
DCC signal: |pin4| connected to LMD18200 pin3 (Direction)
PWM controller: |pin3| connected to LMD18200 pin5 (PWM)
Manual Switch: |pin11| ON/OFF switch to select Auto or Manual mode
Some parts of the program originaly from Michael Blank and tAg and are released under GNU license.
This program is free software; you can redistribute it and/or modify it under the terms of the GNU General Public License as published by the Free Software Foundation; either version 3 of the License, or (at your option) any later version.
This program is distributed in the hope that it will be useful, but WITHOUT ANY WARRANTY; without even the implied warranty of MERCHANTABILITY or FITNESS FOR A PARTICULAR PURPOSE. See the GNU General Public License for more details.
Arduino Pins used..::
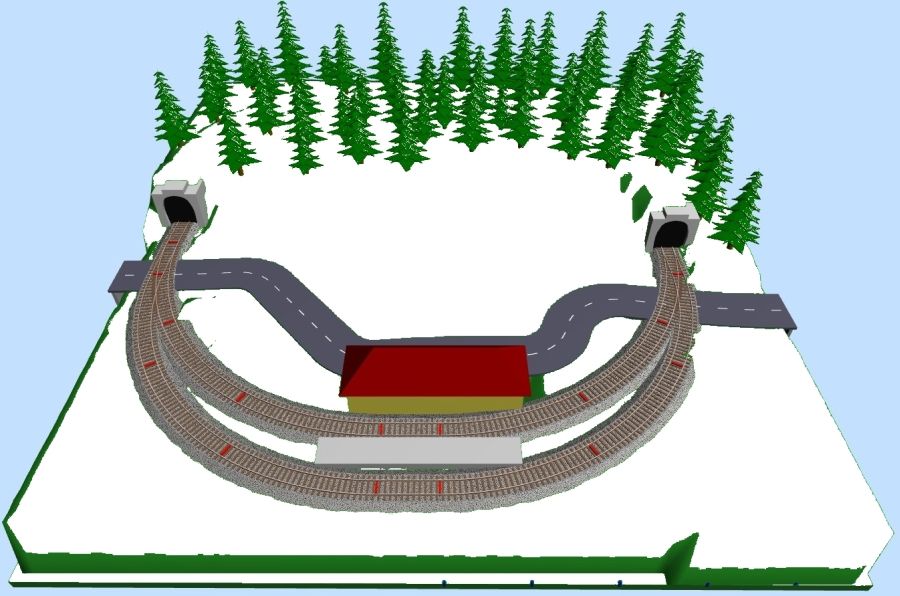
2 Station Stop Reed Switch
3 DCC PWM this is the [Timer2] output
4 DCC signal
7 Passing Stop Reed Switch
8 Parking Stop Reed Switch
9 Parking Stop Reed Switch
11 Auto/Manual mode switch
A0 Throttle #1
A1 Throttle #2
*/
/* *********************** DEFINE AND INITIALISE EVERYTHING ************* */
#define SENSOR1 2 // Station Platform sensor#1
#define SENSOR2 7 // Passing Track sensor#2
#define SENSOR3 8 // Parking Track1 sensor#1
#define SENSOR4 9 // Parking Track2 sensor#2
#define DCC_PWM 3 // HIGH for signal out.[Timer2]Connected "PWM" of -"-
#define DCC_PIN 4 // Arduino pin for DCC connected to "DIR" of LMD18200
#define MAN_SW 11 // MAN/AUTO Switch
#define AN_SPEED1 A0 // analog reading for Speed Poti
#define AN_SPEED2 A1 // analog reading for Speed Poti
//Timer frequency is 2MHz for ( /8 prescale from 16MHz )
#define TIMER_SHORT 0x8D // 58usec pulse length
#define TIMER_LONG 0x1B // 116usec pulse length
unsigned char last_timer = TIMER_SHORT; // store last timer value
unsigned char flag = 0; // used for short or long pulse
unsigned char every_second_isr = 0; // pulse up or down
// definitions for state machine
#define PREAMBLE 0
#define SEPERATOR 1
#define SENDBYTE 2
unsigned char state = PREAMBLE;
unsigned char preamble_count = 16;
unsigned char outbyte = 0;
unsigned char cbit = 0x80;
/* ***************** variables for throttle ************************ */
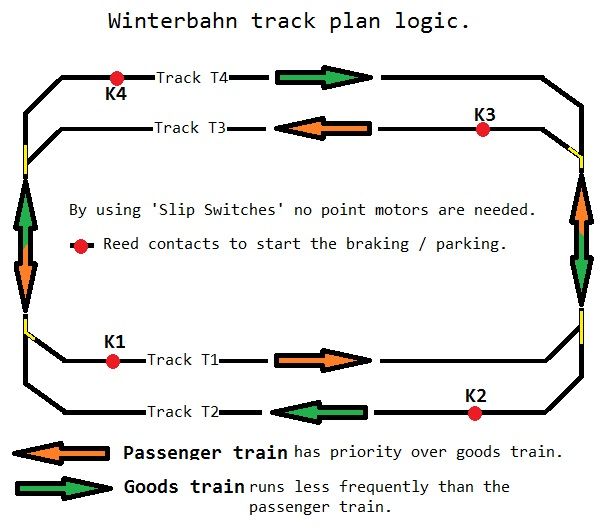
/* ------------------ passenger train ------------------ */
int locoSpeed = 0;
int last_locoSpeed = 0;
int locoAdr = 12; // !!! fixed DCC address of the loco E44.
int locomaxspeed = 96; // 75% of full tilt.
int laps; // number of E44 laps.
/* ------------------ Goods Train --------------------- */
int locoSpeed2 = 0;
int last_locoSpeed2 = 0;
int locoAdr2 = 6; // !!! fixed DCC address of the loco BR53.
int loco2maxspeed = 120; // 90% of full tilt.
int loco2slow = 50; // slows the train through the station.
int totLaps; // number of BR53 Laps.
/* ******************************************************************* */
/* ******************* buffer for command ****************************** */
struct Message {
unsigned char data[7];
unsigned char len;
} ;
#define MAXMSG 3
// use only two messages - the idle msg and the loco Speed msg
struct Message msg[MAXMSG] = {
{ { 0xFF, 0, 0xFF, 0, 0, 0, 0}, 3}, // idle msg
{ { locoAdr, 0x3F, 0, 0, 0, 0, 0}, 4}, // locoMsg with 128 speed steps
{ { locoAdr2, 0x3F, 0, 0, 0, 0, 0}, 4}, // locoMsg with 128 speed steps
}; // loco msg filled later with speed and XOR data byte
int msgIndex = 0;
int byteIndex = 0;
/* *************************************************************************
Setup Timer2. Configures the 8-Bit Timer2 to generate an interrupt at the
specified frequency. Returns the time load value which must be loaded into
TCNT2 inside your ISR (Interrupt Service Routine).
*********************** TIMER2 SETUP *********************************** */
void SetupTimer2() {
//Timer2 Settings: Timer Prescaler /8, mode 0
//Timmer clock = 16MHz/8 = 2MHz oder 0,5usec
TCCR2A = 0;
TCCR2B = 0 << CS22 | 1 << CS21 | 0 << CS20;
//Timer2 Overflow Interrupt Enable
TIMSK2 = 1 << TOIE2;
//load the timer for its first cycle
TCNT2 = TIMER_SHORT;
}
/* ******************** END TIMER2 SETUP ****************************** */
/* ************ Timer2 overflow interrupt vector handler ************** */
ISR(TIMER2_OVF_vect) {
/*
Capture the current timer value TCTN2. This is how much error we have
due to interrupt latency and the work in this function
Reload the timer and correct for latency.
see http://www.uchobby.com/index.php/2007/11/24/arduino-interrupts/
*/
unsigned char latency;
// for every second interupt just toggle signal
if (every_second_isr) {
digitalWrite(DCC_PIN, 1);
every_second_isr = 0;
// set timer to last value
latency = TCNT2;
TCNT2 = latency + last_timer;
} else { // != every second interrupt, advance bit or state
digitalWrite(DCC_PIN, 0);
every_second_isr = 1;
switch (state) {
case PREAMBLE:
flag = 1; // short pulse
preamble_count--;
if (preamble_count == 0) { // advance to next state
state = SEPERATOR;
// get next message
msgIndex++;
if (msgIndex >= MAXMSG) {
msgIndex = 0;
}
byteIndex = 0; //start msg with byte 0
}
break;
case SEPERATOR:
flag = 0; // long pulse
// then advance to next state
state = SENDBYTE;
// goto next byte ...
cbit = 0x80; // send this bit next time first
outbyte = msg[msgIndex].data[byteIndex];
break;
case SENDBYTE:
if (outbyte & cbit) {
flag = 1; // send short pulse
} else {
flag = 0; // send long pulse
}
cbit = cbit >> 1;
if (cbit == 0) { // last bit sent, is there a next byte?
byteIndex++;
if (byteIndex >= msg[msgIndex].len) {
// this was already the XOR byte then advance to preamble
state = PREAMBLE;
preamble_count = 16;
} else {
// send separtor and advance to next byte
state = SEPERATOR ;
}
}
break;
}
if (flag) { // if data==1 then short pulse
latency = TCNT2;
TCNT2 = latency + TIMER_SHORT;
last_timer = TIMER_SHORT;
} else { // long pulse
latency = TCNT2;
TCNT2 = latency + TIMER_LONG;
last_timer = TIMER_LONG;
}
}
}
/* **************************************************************** */
/* ******* FIRSTSTART Routine to get the E44 running ****************** */
void firststart() {
locoSpeed = locomaxspeed;
assemble_dcc_msg();
Serial.println("First Start completed");
}
/* ******************************************************************** */
/* ********************* SETUP ************************************ */
void setup(void) {
Serial.begin(9600);
pinMode(DCC_PWM, OUTPUT);
digitalWrite(DCC_PWM, HIGH);
pinMode(DCC_PIN, OUTPUT);
pinMode(SENSOR1, INPUT);
digitalWrite(SENSOR1, 1);
pinMode(SENSOR2, INPUT);
digitalWrite(SENSOR2, 1);
pinMode(SENSOR3, INPUT);
digitalWrite(SENSOR3, 1);
pinMode(SENSOR4, INPUT);
digitalWrite(SENSOR4, 1);
assemble_dcc_msg();
assemble_dcc_msg2();
laps = 0; // Reset the lap counter.
totLaps = 0;
SetupTimer2();
firststart();
Serial.println("Setup completed");
}
/* ****************** MAIN PROGRAM LOOP *************************** */
void loop(void) {
if ( digitalRead(MAN_SW) ) {
/* ------------- this is the manual mode routine ----------------- */
if (man_loco1()) {
assemble_dcc_msg();
}
if (man_loco2()) {
assemble_dcc_msg2();
}
}
/* ------------ end of the manual mode routine ------------------ */
else {
/* ~~~~~~~~~~~~~ this is the auto routine block ~~~~~~~~~~~~~~~~~~ */
if (totLaps < 3) { // the auto routine should ...
if (auto_loco1()) { // ...only run 3 times then halt.
assemble_dcc_msg();
}
if (laps > 2) { // the Passenger train runs 3...
locoSpeed = 0; // ...times then stops.
assemble_dcc_msg(); // send updated speed packet.
locoSpeed2 = loco2maxspeed; // Then start the Goods train.
assemble_dcc_msg2(); // send updated speed packet.
if (auto_loco2()) {
}
}
}
else { // Stop all trains. Await reset.
locoSpeed = 0;
assemble_dcc_msg(); // send updated speed packet.
locoSpeed2 = 0;
assemble_dcc_msg2(); // send updated speed packet.
}
/* **************** end of the auto routine block ***************** */
} // end MAN_SW block
}
/* **************** END MAIN PROGRAM LOOP ************************* */
/* **************** message assembly routine ********************** */
void assemble_dcc_msg() {
int i;
unsigned char data, xdata;
if (locoSpeed == 1) { // this would result in emergency stop
locoSpeed = 0;
}
data = 0x80;
data |= locoSpeed;
// add XOR byte
xdata = (msg[1].data[0] ^ msg[1].data[1]) ^ data;
noInterrupts(); // only "matching" parts of the message used in ISR
msg[1].data[2] = data;
msg[1].data[3] = xdata;
interrupts();
}
/* **** packet for the goods train (train#2) *** */
void assemble_dcc_msg2() { // speed packet train #2.
int i;
unsigned char data, xdata;
if (locoSpeed2 == 1) { // this would result in emergency stop
locoSpeed2 = 0;
}
data = 0x80;
data |= locoSpeed2;
// add XOR byte
xdata = (msg[2].data[0] ^ msg[2].data[1]) ^ data;
noInterrupts(); // only "matching" parts of message are 2B used in ISR
msg[2].data[2] = data;
msg[2].data[3] = xdata;
interrupts();
}
/* ******************************************************************** */
/* ******************* loco automatic mode routine ******************* */
/* **************** E44 Locomotive ********************************** */
boolean auto_loco1() {
boolean changed = false; // Reset the status flags.
if (digitalRead(SENSOR1)) { // Station reed switch triggered.
locoSpeed = 0; // STOP! CV4 setting will 'gently stop'.
assemble_dcc_msg();
delay(7000); // Wait 7 seconds at the station.
locoSpeed = locomaxspeed; // START!CV3 setting will 'accelerate'.
assemble_dcc_msg();
}
if (digitalRead(SENSOR3)) { // Parking Track reed switch triggered.
locoSpeed = 0; // STOP! CV4 setting will 'gently stop'.
assemble_dcc_msg();
delay(2000); // Wait 2 seconds on the parking track.
laps = laps + 1; // Increment the lap counter and ....
locoSpeed = locomaxspeed ; // Start. CV3 setting will 'accelerate'.
assemble_dcc_msg();
}
if (locoSpeed != last_locoSpeed) {
changed = true;
last_locoSpeed = locoSpeed;
}
return changed;
}
/* ******************************************************************** */
/* **************** BR 53 Locomotive ********************************* */
boolean auto_loco2() {
boolean changed = false;
if (digitalRead(SENSOR2)) { // Passing Loop reed switch triggered.
locoSpeed2 = loco2slow; // Slow down through the station.
assemble_dcc_msg2(); // send updated speed packet.
delay(4000); // After 4 seconds.......
locoSpeed2 = loco2maxspeed; // ... accelerate again to top speed.
assemble_dcc_msg2(); // send updated speed packet.
}
if (digitalRead(SENSOR4)) { // Parking Track2 reed switch triggered.
locoSpeed2 = 0; // STOP! CV4 setting will 'gently stop'.
assemble_dcc_msg2(); // send updated speed packet.
laps = 0; // Reset the lap counter.
assemble_dcc_msg2(); // send updated speed packet.
delay(1000); // Wait 1 second.
totLaps = totLaps + 1; // Increment Total Lap counter and...
locoSpeed = locomaxspeed; // ... START passenger train again.
assemble_dcc_msg();
}
if (locoSpeed2 != last_locoSpeed2) {
changed = true;
last_locoSpeed2 = locoSpeed2;
}
return changed;
}
/* ******************* loco manual mode control routine ************** */
/* ------------------- E44 Locomotive ------------------------------- */
boolean man_loco1() {
boolean changed = false; // Reset the status flags.
locoSpeed = (127L * analogRead(AN_SPEED1)) / 1023;
// Read input from throttle pin A0 & limit range.
if (locoSpeed == 1) { // this would result in emergency stop.
locoSpeed = 0;
}
if (locoSpeed != last_locoSpeed) {
changed = true;
last_locoSpeed = locoSpeed;
}
return changed;
}
/* ------------------------------------------------------------------ */
/* --------------- BR53 Locomotive --------------------------------- */
boolean man_loco2() {
boolean changed = false; // Reset the status flags.
locoSpeed2 = (127L * analogRead(AN_SPEED2)) / 1023;
// Read input from throttle pin A0 & limit range.
if (locoSpeed2 == 1) { // this would result in emergency stop.
locoSpeed2 = 0;
}
if (locoSpeed2 != last_locoSpeed2) {
changed = true;
last_locoSpeed2 = locoSpeed2;
}
return changed;
}
/* ------------------------------------------------------------------ */
/* ******************** THE END ******************************** */